Winning a game with a checkmate is the cherry on top for a chess player. It’s the ultimate goal in a chess match.
I remember when I used a ladder checkmate for the first time to win a game. I cannot put the joy of that moment into words – although I did not know that it had a name back then. Time for you to feel the same.
Checkmate patterns are some particular scenarios that appear on the board time and again. That is why it’s called a “pattern” in the first place.
It’s a recognized way to attack the opposing king until it has nowhere to go. Sometimes it can happen in a single move, and sometimes it may include a sequence of moves – such as mate in one, mate in three, and so on.
Knowing how to checkmate is essential for playing chess, and the checkmate patterns come right after it in terms of significance. They help you spot the immediate win on the board.
Why Checkmate Patterns Matter?
You will often find yourself under time pressure in matches and “searching” for the win. You might have missed an opportunity to checkmate in one move – which might eventually cost you a game.
It helps you make quick decision – and more importantly the right decision. This is why the knowledge of checkmate patterns matters.
There are more than 30 checkmate patterns – 36 is the most prominent number in this case. However, you need not to know each one of them to get thing started.
There are a few positions, or you could say opportunities, that appear frequently on the board of beginners’ games. Mastering those frequent positions will be more than enough to “title” yourself as an intermediate player instead of a beginner. Not to mention, your ratings will rise as well.
I will introduce you to the 5 most common checkmate patterns that you will see more often in your games if you are a beginner.
Trust me, this will help you gain more confidence. I have won multiple games with the fourth pattern mentioned below – and even when I didn’t checkmate, I often won material trying to set that up.
Back Rank Mate
The back rank mate is by far the most common and easiest among all the checkmate patterns. As the name suggests, it involves the most back rank of the board.
The back rank mate occurs when the opposing king is on the back rank, blocked by its own pawns in front, and you give a rook or a queen check along the rank.
8th rank is the back rank if you are playing White. On the other hand, players with Black pieces will count the 1st rank as the back rank.
For convenience, let’s assume we are playing White – which means that the 8th rank is the back rank from our point of view.
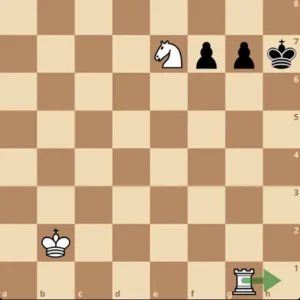
Let’s have a look at the simplest example of this mate.
The White rook jumped from a6 to a8 giving a check to the Black king. Notice that Black cannot escape the check in any of the three ways – capturing, blocking, moving.
Black anyhow capture the rook or block the attack any way! On top of that, the king is blocked by its own pawns in the front. Hence, Black cannot escape the check either.
What does that mean? I won’t tell you. Figure it out yourself.
Let’s look at some more examples. Because examples are the best way to grasp anything.
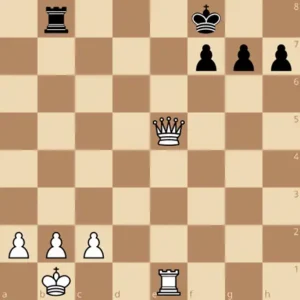
It is white to play. Notice that we cannot directly give a back rank in this case. Otherwise, we will lose our queen.
This particular example needs two steps to finish off the game. The first step is to give a check to e7. This check forces the Black king to move g8 – it has no other way to go.
You are now prepared for the next step – which is to give another check at the e8 square. The rook on b8 must capture the White queen.
By capturing the queen on e8 Black allowed White to strike a back rank checkmate – which happens with taking the Black rook at e8 and giving a check simultaneously. That’s how back rank mate works.
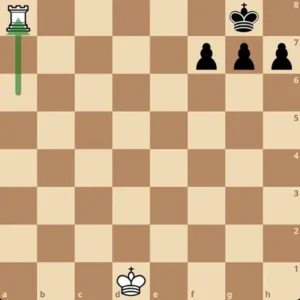
The Ladder Mate
The ladder mate occurs when two rook (or one rook and a queen) push the enemy king to any of the four edges of the board until it’s checkmate. Both attacking rooks work together, one after another. This pattern is also called as the Two Rooks Mate or the Lawnmower Mate.
This is the first pattern that I learned as a beginner. I used to drag every game to a ladder mate because it was easier.
It involves two rooks positioned right beside each other in consecutive ranks or files. They give checks alternately until it’s checkmate.
I know you are waiting for a visual. Here it comes.

You can deliver this mate by replacing a rook with a queen. You may also do it with two queens.
However, I don’t recommend attempting a ladder checkmate with two queens for beginners. You could potentially end up with an unexpected stalemate. So, try to ladder mate your opponent with a pair of rooks.
Anastasia’s Mate
Among the 5 patterns we are covering, Anastasia’s mate is a little bit tricky. Don’t worry. You will get used to it. I promise.
In this pattern, your rook delivers the checkmate with the aid of a knight. Additionally, one of opponent’s pieces help directly in Anastasia’s mate.
Here’s how it works – the enemy king is trapped on the edge of the board while your rook checks. Opposing king is blocked by one of its own pieces, and the knight covers the escaping squares – which leaves the king clueless.
White rook is about to give the last check by jumping to the h1 square. The Black king is blocked by its own pawn at the g7. The other two escaping squares – which are g6 and g8 – are already occupied by the White knight. Here, the knight is helping the rook finish off the game.
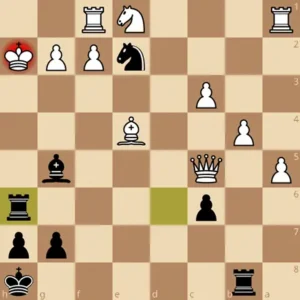
In practical games, it may always not be this obvious. You have to look for the pattern. It may demand a sacrifice of a piece.

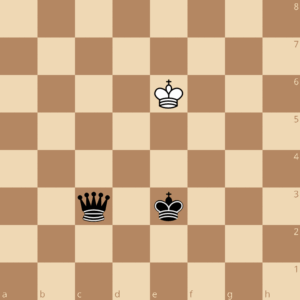
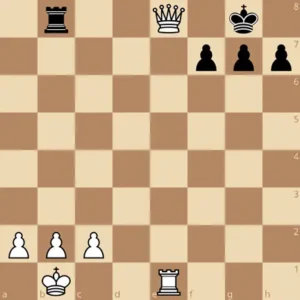
Have a close look at the picture above. Can you find the Anastasia’s mate here?
Well, as I said earlier, it won’t always be so obvious.
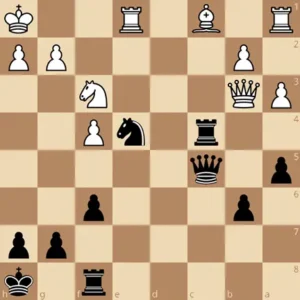
In this particular position, start with the knight check; Ne2+. Black no other moves but to move the king to the h1.
You must sacrifice your queen after this check. Qxh2+ is the key move here. It delivers a check on the Black king – forcing to take the queen. As soon as the king takes the queen, i.e. Kxh2, you will strike back with the rook check: Rh6#.
Since the knight already blocked the g8 and g6 squares, it is indeed a checkmate. I took this example from lichess database. Isn’t it beautiful?
The Smothered Mate
As you may have guessed by the name already, this pattern is about to choke the enemy king – with literally no space to breathe.
A smothered mate occurs on the board when a king is surrounded by its own pieces – literally. The king will have no place to even move a square. An easy example will make more sense.

The White knight gives a simple check on the Black king on e7. The king is literally stuck at the corner. It cannot move. Neither of the Black knight or rook can capture the White knight. The king is indeed smothered.
Smothered mates often require a sequence of moves to make it possible. I’ll give you a more common and practical example to this. I myself mated many opponents this way.
This is my personal favorite among the five we are discussing about in this article.
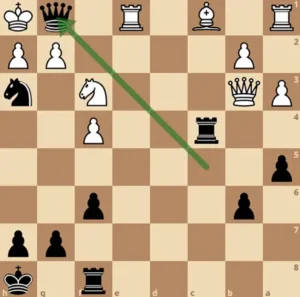
It’s Black to move. The game should be over with a smothered mate in a few moves, if played properly. Starting with the obvious check Nf7+.
The knight cannot be captured. Black king must go to g1. In fact, it’s a forced move.
The next move is to move the knight to h3. This move checks the king from two sides simultaneously.
Black queen and knight are both staring at the White king on g1. It’s a double check. A king must move in case of a double check. Black king goes to h1.
Here comes the killer move. Qg1+! It’s a queen sacrifice. The king cannot take because the knight is also guarding the queen’s square. Black is forced to take the queen with the rook on e1.
Only now you give the final check with the knight Nf2#. And it’s a checkmate. Let’s review the sequence one more time.
1…Nf2+ 2.Kg1 Nh3+ 3.Kh1 Qg1+ 4.Rxg1 Nf2#
The Kill Box Method
This pattern takes place on the board with a queen and a rook making a box to trap the enemy king. Like the ladder mate, a queen and a rook work together here.
You can try it out sometimes as a replacement for the ladder mate.
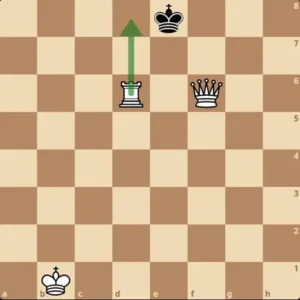
In this pattern, the rook delivers the checkmate with the help of the queen. Both the queen and the rook create a box around the enemy king – hence the name Killer Box.
Conclusion
These are by far the most common checkmate positions that beginners face in their games. My personal experience says that you will be a better competitor once you get used to these mating patterns.
It will help you improve your game. As a result, your ratings will rise – which every beginner desires. The above 5 checkmate patterns are a fuel to your confidence boost. There are lots of patterns that we did not cover here. You will be mature enough to explore them on your own by the time you master these first. Happy checkmates!